How do I make sure a new User can receive Notifications?
Creating a new User includes contact information for sending Notifications.
Depending on the type of control panel in your system, you may have a 4-digit or 6-digit user code.
Note that Panel Only users cannot receive Notifications; when setting up a Panel Only user, no contact information is required.
Creating a new User on the Website:
1. On the left side of the screen, locate Users. Beneath it, select Invite New User.
2. Select the level of access the new User will have.
(See the FAQ Why are there different types of users? What are they? for general information about user types and the FAQ What’s the difference between Panel Sync and User Sync and why are they two separate operations? for more about synchronizing your system's records with the remote service.)
-
Admin: Administrators can create new users, delete users or disable users without deleting them from the system. Administrators can also initiate User Sync operations.
-
Standard users can log into a remote services account from the website or mobile apps to control certain features and functions. However, Standard users cannot create, delete or modify other users’ access to the system.
- Your security professional may refer to Standard users as "normal" or "regular" users.
-
Panel Only users cannot log in to
3. Next...
- Enter the user's first and last names
- Select a username
- Select a language
- Choose 12 or 24 hour time.
-
Decide if you want the system to Prompt for user code.
-
With this switch set to On, Arming or Disarming the system from a mobile device or the website requires the user to enter their 4- or 6-digit user code.
-
With the switch set to Off, the mobile app or web browser automatically sends the person's user code for any operation that requires one, with no need to enter it manually.
-
Click Continue.
4. Next, provide an email address so the user can receive Notifications. You can also designate a mobile phone number so Notifications can be sent by SMS/Text message. Click CONTINUE.
NOTE that this is all you need for a user to receive Notifications. New user setup continues below, but see the FAQ What are Notifications? for more information on fine-tuning what kinds of things you want each user to be notified about.
5. On the Access part of the page, use the checkboxes to set the features the user will be able to operate. If the account has more than one Location, the initial view may look something like the un-expanded view at left below. Click on the name of the Location (not its checkbox; that's for something else) and the details for that location are displayed, as seen below right:
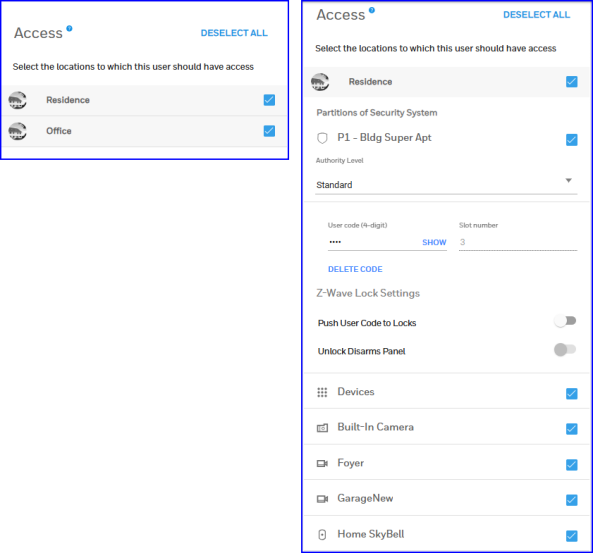
-
After selecting a location(s) where the new user has access, the User Code field can be filled in. To assign a User Code, click in the User Code field and enter a unique sequence of 4 or 6 numbers from 0 - 9.See the FAQ What are User Codes? for more information on how these codes are used.
- You will have the option to set this code for use in multiple Locations on your account, or just for the Location where you are currently setting up the new user's access.
6. Click CREATE USER. A Welcome Email notification appears confirming that new user(s) will be notified. The recipient must click the link in the message to validate the email address and set a password. Rules for creating a secure password are shown.
7. Click OK. The Users list displays the user you have added.
OR
Click VIEW ACTIVITY for confirmation that a User Sync has been initiated.